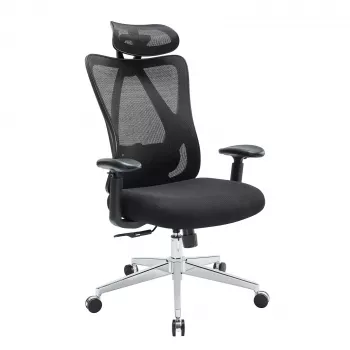
Mesh Ergonomic Office Chair: Lumbar, Headrest & 2D Arms
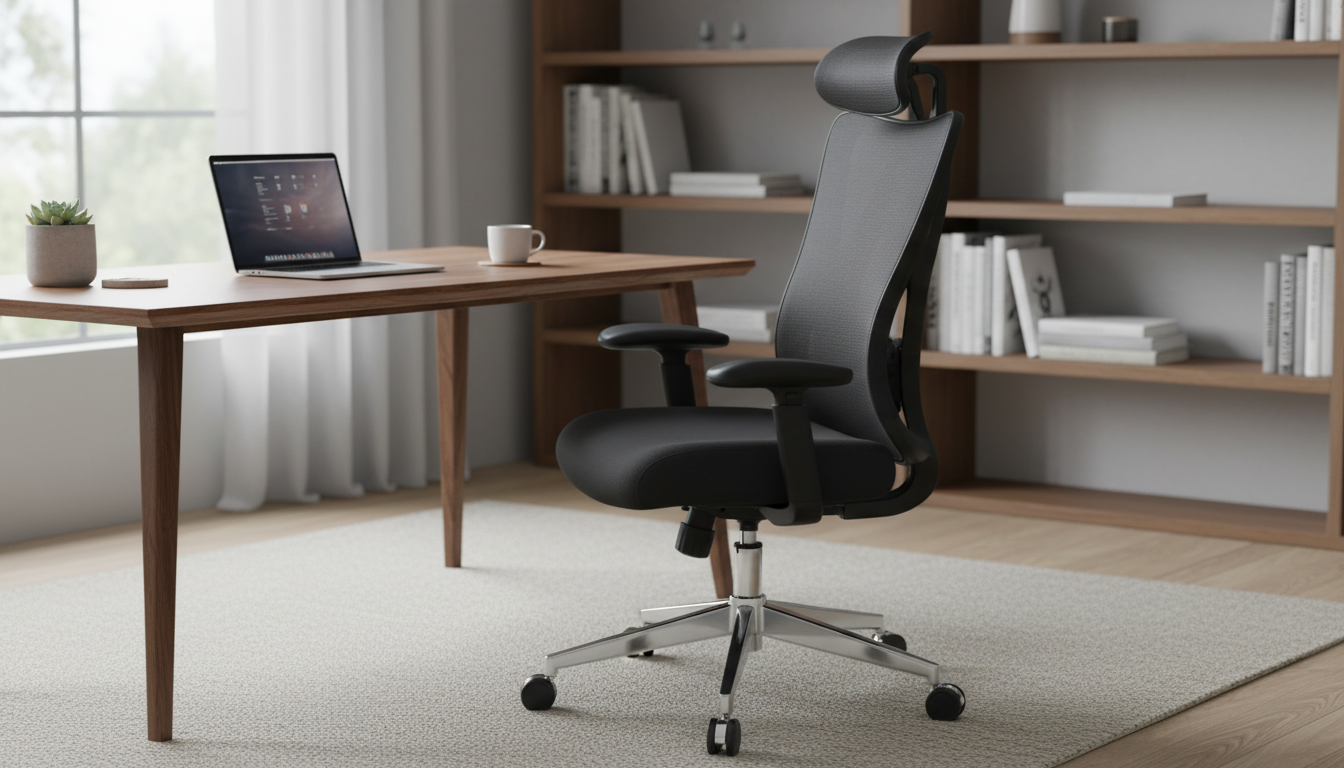
A supportive desk chair should keep the spine neutral, reduce shoulder tension, and stay comfortable through long work sessions. This mesh model focuses on breathable back support, a height-adjustable headrest, and 2D armrests that help align elbows and wrists for typing and mousing. If you’re upgrading a home office or tightening up a study setup, the goal is simple: feel “held up” without feeling locked in.
What Makes This Chair Comfortable for Long Hours
All-day comfort usually comes down to heat management, back support, and how easily a chair adapts to your body and desk. A mesh-back ergonomic chair checks those boxes with a few practical design wins.
- Mesh back promotes airflow to help reduce heat build-up during extended sitting, especially in warmer rooms or under bright task lighting.
- Lumbar support encourages a natural lower-back curve rather than a slouched posture that can fatigue the low back and hips over time.
- Adjustable headrest helps reduce neck strain when leaning back to read, review notes, or take a quick recovery pause.
- 2D armrests provide basic positioning to keep shoulders relaxed and forearms supported—key for typing and mouse work.
If you want to see the full product details, visit Ergonomic Mesh Office Chair with Lumbar Support, Adjustable Headrest & 2D Arms.
Lumbar Support: How to Set It Up for Real Relief
Lumbar support works best when it “fills in” the curve that naturally exists in the lower back. If it’s too high or too aggressive, it can feel like it’s pushing you out of the chair.
- Place the lumbar support at the lower back curve, not the mid-back. The contact point should be around the beltline area for most people.
- Aim for a gentle, even pressure—supportive without forcing the pelvis forward or arching the back excessively.
- Match lumbar setup with seat height so feet rest flat and knees sit roughly level with hips (or slightly lower for some users).
- Re-check after recline changes. Recline tension and angle can subtly change where your back meets the support.
For more workstation posture guidance, see the recommendations from OSHA’s Computer Workstations eTool and NIOSH ergonomics resources.
Adjustable Headrest: Neck Support Without Forcing the Chin Forward
A headrest is most helpful when you recline—think of it as occasional support, not something that should hold your head up while you’re actively working.
- Set headrest height for the upper neck/base of skull so it meets you when leaning back, rather than pressing into the middle of the neck.
- Avoid an angle that pushes the head forward. If your chin feels nudged toward your chest, reduce the headrest angle/pressure.
- Use it during recline and short breaks, not to prop the head while typing—active work is typically best with the head balanced over the shoulders.
- Fix monitor height before relying on the headrest. If your screen is low, you may crane forward and then “fight” the headrest.
For neutral posture fundamentals (head, shoulders, and spine alignment), Cornell’s ergonomics guidance is a helpful reference: Cornell University Ergonomics.
2D Armrests: Practical Adjustments for Typing and Mousing
2D armrests typically adjust in two ways—commonly height and width (in/out). While they don’t offer the extra fine-tuning of 3D or 4D arms, they can still make a noticeable difference in comfort when set correctly.
- Use armrest height to keep shoulders down and elbows close to your sides, reducing upper-trap tension.
- Adjust width so forearms feel supported without flaring elbows outward, which can strain shoulders and wrists.
- Leave a small gap from the desk edge to avoid compressing the forearm near the wrist—especially important during long mouse sessions.
- If armrests block desk access, lower them slightly or widen them to clear the tabletop while maintaining forearm support.
Breathable Mesh vs. Cushioned Upholstery: When Mesh Wins
Mesh is often the better choice for people who run warm, shift positions frequently, or want a backrest that feels supportive without being bulky.
Fit and Desk Setup: Small Tweaks That Make the Chair Feel Custom
Quick Reference: Setup Checklist
| Adjustment | Target Feel | Common Mistake |
|---|---|---|
| Seat height | Feet flat; hips and knees comfortably aligned | Sitting too high and dangling feet |
| Lumbar support | Lower back gently supported | Support placed too high in mid-back |
| Armrest height/width (2D) | Shoulders relaxed; elbows supported near the body | Armrests too high, shrugging shoulders |
| Headrest height | Supports upper neck when reclining | Pushing head forward while typing |
| Recline/tension | Easy lean-back without collapsing | Tension too loose, slumping |
Assembly, Care, and Long-Term Comfort
Who This Chair Tends to Suit Best
More In-Stock Picks for Your Workspace
- Portable USB Voice Recorder & Digital Audio Sound Recorder with 8GB/32GB Storage for quick meeting notes and reminders.
- Ultra HD 4K WiFi Body Camera with Night Vision & Motion Detection for hands-free recording in training, walkthroughs, or documentation tasks.
- Wooden Multiplication Board for Kids as a screen-free learning option for a nearby homework station.
FAQ
What is the difference between 2D armrests and 3D/4D armrests on an office chair?
2D armrests usually adjust in two directions—most commonly height and width (in/out). 3D armrests typically add pivot/angle, while 4D armrests often add a fore/aft slide for finer positioning; 2D can still work very well when set to keep shoulders relaxed and wrists neutral.
How should lumbar support feel when it’s adjusted correctly?
It should feel like gentle “filled-in” support in the lower back curve—steady and comfortable, not sharp or forceful. If it pushes your hips forward, feels like a lump in the mid-back, or creates pinching, it needs repositioning.


Leave a comment