LED RC Helicopter with HD Camera (2.4GHz) Guide

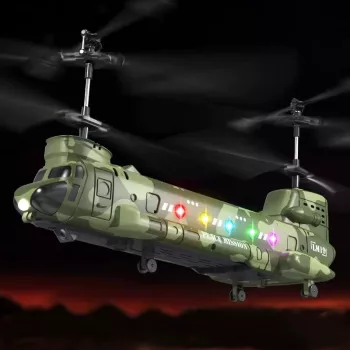
RC Helicopter with LED Lights and HD Camera – 2.4G Remote Control Aircraft
A compact RC helicopter with bright LED lighting and an onboard HD camera adds a new layer to indoor flight: easier orientation, more controlled hovering, and short aerial clips that make practice sessions more rewarding. Whether you’re learning to hover in the living room or doing quick backyard passes, the right setup and habits make a noticeable difference in stability, battery life, and how long the moving parts stay smooth.
If you’re shopping for a ready-to-fly option, the RC Helicopter with LED Lights and HD Camera – 2.4G Remote Control Aircraft is built for casual practice where quick setup and easy visibility matter more than extreme range.
What makes this RC helicopter different
- LED lights improve visibility and orientation: In dim rooms it’s easy to lose track of nose vs. tail. Bright LEDs make it simpler to keep the helicopter pointed the way you intend.
- An onboard HD camera adds feedback: Beginners can review short clips to spot drifting, over-corrections, and landing habits that are hard to notice in the moment.
- 2.4G control helps reduce interference: Compared with older single-band toy remotes, 2.4 GHz control is typically more reliable when multiple RC devices are used nearby (see the FCC’s overview of unlicensed 2.4 GHz operations).
- Made for quick, casual flights: It’s designed for indoor sessions and light backyard flying where fast “charge, pair, and go” convenience matters.
Quick-start setup checklist
- Charge fully before the first flight: Partial charges often lead to weak lift and sudden drop-offs that feel like “random” power loss.
- Start on a level surface: If the helicopter is tilted at takeoff, it may drift immediately and trigger rushed corrections.
- Pair the remote and helicopter carefully: Follow the included steps, then do a brief throttle test (just enough to confirm response) before liftoff.
- Pick a calm practice zone: Indoors, clear space away from fans, pets, curtains, and fragile items; outdoors, avoid gusty areas and tight obstacles.
- Ease into throttle: Smooth increases reduce bounce and tail swing during liftoff, especially for new pilots.
Flight handling basics for smoother hovering
Most “wobble” during early flights comes from over-correcting. The helicopter reacts with a slight delay, so rapid stick movements can stack corrections on top of each other.
- Use small inputs: Think in short taps and micro-adjustments rather than long pushes.
- Practice a low hover first: Knee height is ideal—less damage in a tip-over and faster recovery when it drifts.
- Correct, then pause: If it slides left, tap right briefly, then let it settle before changing again.
- Land gradually: Reduce throttle smoothly; cutting throttle to zero from a hover often causes a hard drop and tip-over.
- LED “night-style” indoor flying: LEDs help orientation, but keep speed low. Disorientation happens quickly in small rooms when the helicopter rotates and the background is dark.
Using the HD camera effectively
The onboard camera is most useful as a skill-building tool. Short clips can highlight habits like “pumping” the throttle, yanking turns, or drifting during approach.
- Record in well-lit areas: LEDs help you see the aircraft, but they won’t replace room lighting for cleaner video.
- Keep movements smooth while filming: Gentle throttle changes usually reduce rolling-shutter wobble and make footage easier to watch.
- Clean the lens carefully: A quick wipe with a microfiber cloth can remove haze from fingerprints and dust.
- Prioritize stability if it feels sluggish: Filming can add a bit of strain; shorten flights and focus on controlled hovering and soft landings.
If the main goal is body-mounted recording instead of aerial clips, consider a dedicated camera like the Ultra HD 4K WiFi Body Camera with Night Vision & Motion Detection for hands-free footage while you pilot.
Feature overview at a glance
Use this comparison-style checklist to confirm the helicopter matches the intended use (indoor practice, casual backyard flights, learning basic control).
| Feature | Practical benefit | Best use case |
|---|---|---|
| LED lights | Improves orientation and visibility | Indoor flying, evening play, learning nose/tail direction |
| HD camera | Captures flights for review and sharing | Practice sessions, short aerial clips |
| 2.4G remote control | More stable connection in busy areas | Homes with multiple RC devices nearby |
| Helicopter form factor | Natural vertical lift and controlled hovering | Beginner hovering drills, precision landings |
Battery care and durable everyday use
Safety and responsible flying
- Keep clear of faces and hands: Rotors can pinch or scratch during close handling.
- Supervise younger pilots: Establish a simple takeoff/landing zone rule so no one steps into the flight path.
- Choose safer outdoor spots: Avoid roads, crowds, and power lines; open areas with minimal obstacles are best.
- Follow local guidelines: Recreational rules vary by location and may differ for aircraft with cameras—review the FAA’s Recreational Flyers & Safety Guidelines before flying outdoors.
When this helicopter is a good fit (and when it isn’t)
FAQ
Can the helicopter be flown indoors safely?
Yes, if you clear a wide area, avoid fans and fragile items, and start with low-hover practice. Use small control inputs and land gently to reduce tip-overs.
Do the LED lights help the camera footage at night?
They help you maintain orientation and may add a small amount of nearby illumination, but room lighting still matters for clearer HD video. For best results, record in a well-lit space even when flying “night-style” indoors.
What should be checked after a crash?
Inspect rotor blades and guards for chips or bends, remove any debris from moving parts, and confirm it spins up smoothly without wobble. Then test a brief low hover before returning to normal flying.










Leave a comment